Boat Deck Installation: Tool List
First and foremost I’d like to cover the complete tool list and the use of each tool. We sell some of the tools needed; however, the purpose of our company is not to sell you tools and we only offer them as a convenience to you. Through experience, PlasDECK installers have found these tools to be the most affective for the job. Our goal is to help you obtain a beautiful, affordable, safe deck for your boat that you can be proud of.

Utility Knife
A standard utility knife with a retractable blade system is fine. You are going to be using this knife a lot. Go down to your local hardware store and choose a knife that will feel comfortable in your hand and if there are any other people who will be cutting I would suggest having them pick their own knife as well.

Blades
CURVED BLADES! I cannot emphasize this enough. I started the project just using a plain straight blade and struggled with the cuts. The blade is wide and hard to control. Do yourself a favor and get some curved blades. We sell two different styles of curved blades: the hooked blade (top) and the curved blade (bottom). We couldn’t fi nd the curved blade anywhere in the states so we had to import the curved blade from the UK. The hooked blade is available at your local hardware store. Make sure you are always using a sharp blade. If you find yourself struggling with the cuts, switch to a new sharp blade.
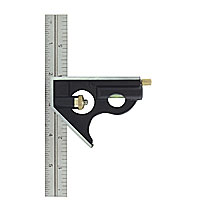
Small Metal Square
Just a 6” square will do. If your boat is anything like mine you’re probably thinking there is not one 90 degree angle on the boat and you are probably right. It won’t be your main tool but I was happy to have it there when I did need it. This can be purchased from your local hardware store.

Marking Pen or Pencil
I had a small pile of sharp pencils on hand because the grain of the PlasDECK dulls the lead. I chose pencil just because I like using pencils. If you are more comfortable with a pen go with a ball point pen. Both will mark the PlasDECK well enough to make cuts but ink is harder to get off the PlasDECK than pencil.
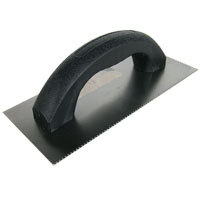
Trowel
A 1/16 inch square notched trowel. You will be using this to spread out the glue. Remember to clean your trowel after each use. It makes life so much easier to have a clean trowel when you move on to another area. We sell these as well or if you prefer your local hardware store will have these available.

Formica or Floor Roller
This is used to ensure that a proper bond is achieved when laying your deck. The one we sell extends up to 27” and the rubber roller is 7 ½” wide. It works great.

Metal Ruler
The tool of champions! The ruler was near me during the entire project. Get one you like because you’ll be using it a lot.

1 Gallon of Denatured Alcohol
I started off with a little can of this stuff then quickly realized I should have gotten a gallon. You’ll use it for prepping and cleaning everything
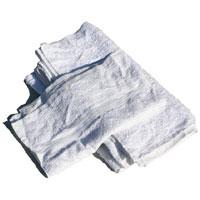
A good stack of Clean White Rags
USE WHITE RAGS! Pre-cut an old white cotton t-shirt or something along those lines. Don’t get any rags with color dye in them. When I did my initial wipe down on the bow of my boat with a red cloth, I spent over an hour scrubbing the red off. Denatured alcohol really works!

Sausage Gun and/or Standard Caulk Gun
I had both at my disposal. And I used them both. I used the caulk gun in small areas and the sausage gun in larger areas. We sell the sausage gun. I’m not really sure where you’d get one.
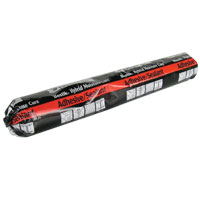
Sausage Glue
This is where we are finicky. We only recommend and support the use of Bostik Hybrid Moisture Cure adhesive/sealant with our deck. It sticks like crazy and won’t harm or discolor the PlasDECK. The sausage glue is slow curing and gives you time to work (20- 30 minutes). We offer black and white. Black glues should be used to fill in the body because if any seeps through it will blend with the caulk lines. White is great for margins because it will blend with the fiberglass around the edges. I only used the black Sausage during the install because I used it to fill in large spaces. We sell the sausages. Or you can try online.

Caulking
Once again this is an area we don’t bend on. Use Bostik Marine Grade 940FS High Performance adhesive/sealant. This stuff skins over very quickly. Keep that in mind while you are using it. We offer black and white. I’ve used a lot of white because I wanted my margins to set quickly.
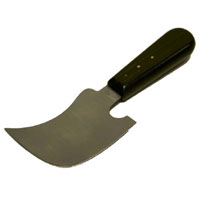
Spatula Knife
This is also pretty tricky. I’ve talked to all of our installers and the only knife they use is the spatula knife we sell. It’s just perfect for cutting off the excess caulk.

Rubber Gloves
My husband didn’t wear any gloves during the installation. I decided to put this in here because the denatured alcohol messed up my nail polish and the glue was hard to clean off my hands. So I went and got un-powdered rubber gloves like the doctor wears.

Vinyl Shears
Take a look at the picture. These things are sharp and cut the PlasDECK like butter. The ones we sell are imported from the UK because we have not found more perfect cutters in the States.

Cheese Grater Tool
It’s not really a cheese grater but that’s become the company nickname. It’s really called a surform shaver 21-115. You can get one at your local hardware store.

40 Grit Sandpaper & Sanding Block
You’re going to need this at the end of the project to blend your edges.
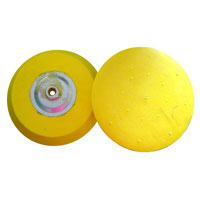
6” Round Sanding Pad
I used a 6” sanding pad that attaches to the end of my high speed drill because I am impatient. I used it to knock down the ridges around the non-skid area before laying the PlasDECK.

Variable Speed Drill
Not entirely necessary but I used it. I used the high speed to knock down the high spots on my boat and the slow speed for finish sanding.

2” Drum Sander with 40 Grit Paper
This is a dream for finish sanding.

Dust Mask
If you’re going to be sanding on fiberglass it’s a good idea to not breathe the dust. It’s really not good for you.

Safety Goggles
What would you rather have? Scratched eyes or a pair of glasses on when running power tools?