Boat Deck Installation: Preparation
One note about the glue and caulk: it is best to assume that you will get the glue on you at some point. Clothes that can be sacrificed are best. Loose sleeves, shirt tails or anything that can droop down into the glue should be bound up or done away with. Long hair should be pulled back. If you choose to wear gloves, be prepared to change them often. Anything that touches the glue will immediately start spreading it to everything in reach. Denatured alcohol will clean the glue off of most surfaces on a boat.
Now that you’ve got on your work clothes remove any deck gear that you want the new deck to go under. PlasDECK is quite capable of supporting winches, stanchions, etc. You may leave any large or hard to remove items and lay/cut around them. I took everything off of my boat. It helps if you remove the hatches too. While you’re doing this start thinking of how you’d like your deck to look. It’ll be easier to visualize once you have all the hardware and stuff off of your boat.
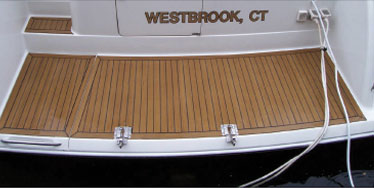
Fig. 1
Now would be a good time to decide what kind of decking style you want. Do you want a Traditional Style deck or a New York Style deck? A Traditional Style most closely replicates the look of a classic teak deck (see Fig. 1). When using real hardwoods for marine decking it is crucial to minimize the amount of exposed end grain in order to prevent rotting and premature failure. For this reason most real teak decks use margin boards to seal the end grain of the decking planks. Essentially there are boards around the entire perimeter of the deck and hatches. You can replicate this design to achieve the most authentic classic look.

Fig. 2
The New York Style has NO margin boards around the borders (see Fig. 2). Named after the pinstripe uniforms of the Bronx Bombers our New York Pattern gives a more modern, sporty look. As our synthetic material does not suffer from the deteriorating effects of water and weather it is not imperative to enclose the end grain of the planks. The longer caulking lines visually enhance smaller swim platforms and give a clean, uncluttered appearance. This pattern also helps minimize the visual breaks between hatches and lockers.
After you’ve decided what areas are getting the PlasDECK you may have a bit of sanding to do. Take a hatch for instance. Does the non-skid area have a ridge around it? If so, you may want to take some 40 grit sandpaper and knock it down a bit (see Fig. 3 and Fig. 4). PlasDECK is very forgiving and the surface doesn’t have to be as flat as possible. Just keep in mind any areas where there is a notable bump or ridge may cause a lump on the deck.

Fig. 3

Fig. 4
After you’ve given the fiberglass the once over with sanding, clean off the dust with a shop-vac and then wipe it down with denatured alcohol (see Fig. 5).

Fig. 5
Helpful Hint: PlasDECK is very flexible. The material can be left in the sun while you work so it will be even easier to bend and shape to follow the curves of the boat.