Boat Deck Installation: Borders/Margins
The first stage is to lay the margins or border, if you have chosen a Traditional Style deck. (Both ‘margins’ and ‘borders’ will refer to the same concept throughout this laying guide.) If you don’t want to caulk the edges around the outside edge of your deck, you will use E-606, which will allow the PlasDECK to smoothly transition back down to the edges of the original deck. If you plan to caulk the outside edge you will use the 6” rolls of E-600 and slice it lengthwise to the desired width. Normally, margins are 2 ¼”. To design hatch corners and king planks you will use the E-600.

Fig. 6

Fig. 7
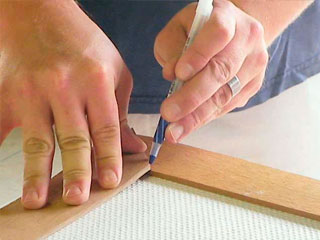
Fig. 8

Fig. 9
To ensure that you get the right angle on joined corners, lay the intersecting pieces together, overlapping. Make marks with your pencil where the pieces intersect. Connect your marks to create a line where the pieces will meet to create the mitred corner (see Fig. 6). Cut the top piece on the marked line (see Fig. 7). After you cut the top piece, trace the cut edge onto the bottom piece (see Fig. 8 ) and cut. The diagram in Fig. 9 shows an overview of this process.
Next, you will need to mark out where you will be applying glue for your margins. When you have cut and dry fit the margins, trace the inside edge of the margins with a pen.
Tape to the inside of this line with 2” masking tape so excess glue can be easily removed. Remove the margin pieces. Label them on the underside if necessary so you can re-lay them in order. Clean and vacuum the areas that will be glued. Wipe down the deck with denatured alcohol and wipe the underside of each piece just prior to gluing. The cleaner the surfaces are the better adhesion you will have.
Fast Skin glue (PT-2507/2508) is often used for margins because it will set quickly. Sausage Glue (PT-2503/2504) also works great and gives you more time, with an average work time of about 20-30 minutes. High temperature and/or humidity can shorten this time. If you are using the E-605 round-over edges, white glue can be used instead of black in case any excess glue seeps out. White glue will not be as noticeable against the fiberglass. If you are making your margins out of E-602 and are planning to caulk a black edge, use black glue. If you are going over non-skid be sure to thoroughly fill the low areas of the non-skid pattern.
Spread the glue with the notched trowel just to the tape line (see Fig. 10). The sides of the trowel with the smaller notches will work well for these areas. If the deck is fairly smooth, the side with larger, square notches can be used. For longer margin pieces it may be better to spread enough glue for half of the piece. Wipe the piece with denatured alcohol and lay the first part, folding the remainder back. Spread more glue, and then lay the rest of the piece.
Continue applying glue and laying the margin pieces. Roll over them with the floor roller using a firm, even pressure. Lay weights (bricks work well, see Fig. 11), especially on sharper curves, and allow everything to cure overnight. Pull up the masking tape before the glue is dry. To deck around a hatch corner, or around any hardware that’s still mounted on your boat, use the E-600. If you need a larger piece, join two or more pieces of E-600 together to form a section large enough to allow the corner radius to be cut out.
Make a template of the hatch corner or hardware by tracing the shape onto a piece of paper then trim your paper template to the required size. Place the template on the E-600. Mark with a pen and cut using a sharp craft knife with a curved blade. A straight blade will work but a curved blade will reduce the friction when cutting curves.

Fig. 10

Fig. 11